Friday, June 24, 2016

Body Work

Life got in the way so, I haven't posted for a while.  I've set the goal to paint and roll by next Spring.  So, it's time to start the body work.  I decided to start with the front wheel wells.  I know, I know.  You're saying "Didn't you know you can buy those?".  Well, I've learned that after market parts are never as good as originals.  They are always thinner and never seem to fit perfect.  More than that though, I'm cheap and since these wheel wells won't really be seen by anybody that looks at my car (I don't plan to enter any car shows) this is a good place to practice my welding and sheet metal skills.


Ya, they look pretty rough.  The only areas that aren't rusted are the areas covered by road tar.  It looks like the prior owner passed a little too close to a road crew at some point.


Most of the bolt holes had been wobbled out and some had cracked the metal.  So, after stripping all the paint, rust and road tar off, I proceeded to weld patches on the trouble spots.


Clamp


Weld


Grind


Cut a new hole


Same process on the other wheel well


I used the POR-15 process to cover everything.  I have used it on other projects and if you follow the directions it works great and leaves a ceramic kind of coating.  The one problem is that if the item is exposed to UV rays it will develop a white powder kind of coating.  That shouldn't be a problem with these wheel wells.


The major problem I had to tackle was an access hole the previous owner had cut into the passenger side wheel well to access a bad blower motor.  I guess that was easier than removing the fender.  I decided to put a removable patch in there since it was much easier than trying to butt weld a patch in and who knows?  I may need in there again someday.


Since this part is completely covered by the fender, I'm not too worried about what the back side looks like.  I may put a silicon gasket in there someday, but for now, I have no plans to drive in the rain or even when there's the possibility of rain.


And they ended up looking like this.  Now on to the fenders, the doors, the roof the rear quarters, the.....


Friday, February 19, 2016

Electrical stuff

I really wanted to clean up the engine bay so, I rerouted transmission lines and I wanted to reroute some of the wiring.  The factory harness just drapes wire all over the engine.  So, I started to tag and trace everything.  I used binder clips and toe tags.  I guess that's what their called anyway.  Every wire got marked.


With the engine started, it quickly became apparent that the old 61 amp, or so, alternator wasn't going to cut it with the new radiator fans.  I was planning to clean up the engine bay wiring anyway so, that was the next chore.


I installed a 140 amp alternator with an internal voltage regulator so I could have just one wire running across the engine instead of the bundle in the factory wiring harness.  When I took that bundle apart to trace wires, I found 4 or 5 wires in there that were terminated.  They must have been used on options my car didn't have.  I also ran one wire to the new engine temp sensor.


This is all that's left of the factory wiring.  I removed all the old voltage regulator, alternator and coil wires.  The wires that used to run across the engine to the coil, electric choke and oil pressure are now routed through the interior of the car and come out on the passenger side.


You can see the rerouted wires coming out, just below the A/C air intake.  The stubbed one is for the transmission temp sensor.  I didn't think about installing it sooner.  To do that now, I would need to drain the tranny and braze the sensor adapter into the fluid pan.  So, I'll wait until I change the fluid and filter at the 500 mile mark.  (Because I rebuilt the tranny.)  I'm not too concerned about the transmission overheating while I break in the engine.

You will also notice that the monster air conditioning evaporator didn't go back on.  I hate the looks of that thing.  I'm sure that after sitting for the last decade or more, all the o-rings leak and I'm not sure it even works because the compressor was gone when I bought it.  I added it up and to recondition that monstrosity and replace all the parts I would need, it would cost more than one of the new Vintage Air A/C systems, and I'd still have old less efficient tech.  So, I've ordered an A/C delete plate that I will put on there and eventually replace everything under the dash with a Vintage Air system.


I went with the Equus 8000 series gauges.  I like the look and the one I used to replace the dummy light during engine start up worked well.  For now, I've just wired them all out of the radio hole in the dash.  I'm going to create a plate for them to mount in when I remodel the interior.  I'll either fabricate a mount for the stereo where the ash tray used to be or put it in the glove compartment.

Monday, January 11, 2016

Startup

I finally lit a fire in the old girl.  She may not be the prettiest girl at the dance, but at least she can get her groove on now.

https://youtu.be/Xc738EfFjQY

Wednesday, January 6, 2016

Radiator

I decided to go with a 3 core aluminum radiator.  The aluminum radiators are almost the same dimensions as the original...almost.  So, I had to make some brackets to get around the core support area and hold the radiator tight since I couldn't use the old fan shroud even if I wanted to because of the difference in size.

My wife didn't think my zip-tie mounting brackets would work very well, but they did the job of holding the radiator in place while I secured it.


For the bottom braces I had to get around a some core support frame so I built the brace you see below.


After welding the pieces together


I coated the braces in Plasti-dip


The top brackets where much more simple.  A piece of steel bent into a 90 degree angle, drilled for a bolt hole and ground to fit and then painted.  After final fitment, I did put a slice of bicycle inner tube between the bracket and the radiator.


Then, I had to build a mounting bracket for the radiator over flow.  Here is the one that came in the car.  Now I know where Downy fabric softner got the idea for their bottle!  From a 1970 Lemans radiator overflow reservoir.


I built this bracket instead.


Then painted it black and bolted it on.  You can see the new overflow above it.  Wifey says it looks much better than the old one.  I don't know.  The old one may have held softer water.


Lastly the tranny cooling lines.  In an effort to clean out the engine bay as much as possible.  I'm going to try and route these through the fender above the wheel well.  If it doesn't work, I can always change them back.

Tuesday, November 17, 2015

Rear End

Before I installed the new motor, I replaced the front brake lines, master cylinder, etc.  When I started to bleed the brake lines, I found that I couldn't get fluid out of the rear brakes.  I had the new posi-track axle that I had planned to put in later but, decided this was the best time rather than repair brakes I wasn't going to use.

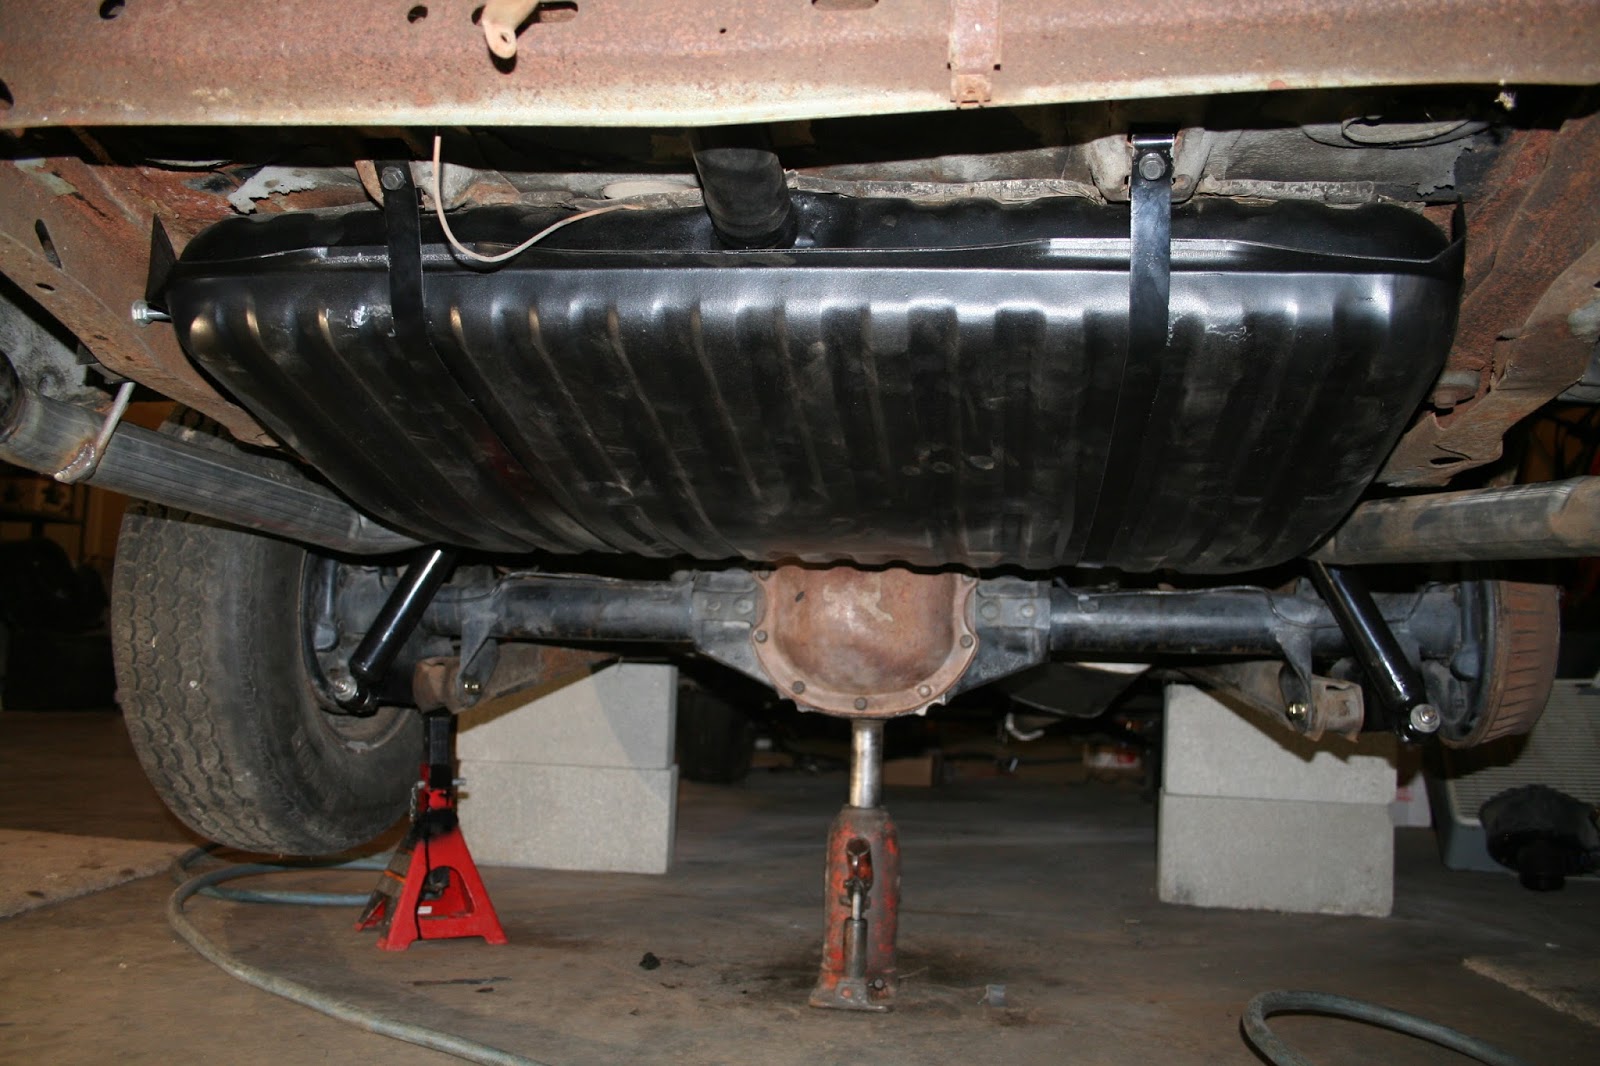
So, out came the old axle, after taking off the rear bumper that's dented and will be replace and after taking out the gas tank which was rusted and needed replaced.


I opened up the new axle and inspected the gears.  There was little to no sign of wear and when I pulled the brake drums off I found a new brake job so, I'm fairly confident in the quality and since I only paid $300, I think I got a steal.


Here you can see the old "One Tire Fryer" axle on top and the limited slip axle on bottom.  I don't know what the Posi axle was in most recently but, the numbers on it say that it came out of a late 60's Grand Prix.  It kind of makes me feel like singing that old Sesame Street song, One of these things is not like the other.  The most obvious difference is that the previous installation used leaf springs and there are no coil spring brackets on the Posi unit.  There's also a missing rubber bumper.  The other difference isn't so apparent.  Look at the shock absorber mounting bolts.


The difference is a little clearer here.  Apparently the prior owner, didn't have any bolts so the solution was to weld two 3/4 sockets over the holes.  I pulled the rubber out of the old shock and the steel ring fit over the socket...barely.


Needless to say, they had to come off.  I wonder how much damage the shocks did to the body without the little bit of side to side play the rubber gives them.


So, with the sockets cut off, the rubber bumper pad installed and the coil mounts cut from the old axle and welded to the new axle precisely where they had been in the old application, it's ready to go in.


No time like the present to pull the old drive line out and replace the U-Joints.


I wonder how much a pile of 45 year old U-Joints would go for on eBay?  I replaced both joints with some heavy duty Moog joints.  I'm pretty sure the ones that came out were installed at the factory.  They were pretty harsh.


I connected the lower control arms and leveled the differential.  While it was still down I filled the case with a bottle of GM limited slip additive then topped it off with Valvoline high performance gear oil.  Then with a couple of jacks and a couple of jack stands I maneuvered it in place  bolted on the upper arms and installed new shocks.


I was washing the new tank with degreaser to prep for paint and heard a rattling in the tank.  The float had come off the sending unit that had been installed prior to shipping.  I'm glad I found it now.  If it had come off a little later, I would have been chasing electrical for weeks and still not solved the mystery.  After fishing it out and securing it, I painted the tank with a rubberized coating.


Before I installed the tank I put some air to the fuel line and blew out a cup or two of old gas.  Then, I rigged my air nozzle with the straw from a can of brake cleaner along side it and blew an entire can of brake cleaner through the line up to where it will connect to the fuel pump and then more air to dry it out.  After that, a new set of straps tied the tank to the frame and I sat her back on the ground for the first time in a few months.  I'm not putting any effort into the undercarriage at this point.  My goal is to get her looking good and on the road.  After that, I can use the hoist at my son's place of employment to more easily strip and coat the undercarriage.

Friday, October 30, 2015

Little Things

And when I say little things, I mean little things as in carb parts.  It's been a while since I posted to the blog.  A few months ago, I injured the tendon in the back of my thumb.  The one you use to lift your thumb up to hitch hike.  Well, it goes into your wrist and up your forearm and you lose all your grip.  So, I haven't been able to tackle big jobs like the rear-end swap.  Instead, I busied myself with a few small things that needed done that took forever using mostly one hand and my left had at that.  Oh, and try typing sometime with your right thumb and wrist in a brace..so, no blog entries.

Carburetor Rebuild


Since I'm on a budget, I decided to not really rebuild, but freshen up the 650 cfm Edelbrock that came on the car.  I bought a kit with new gaskets, floats, etc.


I don't know much about carbs but, this Edlebrock seemed fairly simple.  A mechanic son of mine told me that whatever I did, I should not take the rod assemblies on the sides apart because they're a nightmare to put back together.  I had to take the little pump actuator off to get the top off and it took me a while to figure out how it went back on even with all the pictures I take.


With the body disassembled, I cleaned everything out really well with carb cleaner.


Then I replaced all of the old parts that had new pieces in the kit.  After sitting behind a barn for the last 10 years, all the fuel had evaporated and it took a little work to get all the varnish out.


Steering Assembly


Steering seems to be something I'll want to do, so I started at the steering wheel and worked my way down.  Back in January of 2014, there's a blog post of where I rebuilt the top end of the column.  I had to.  The little cog that the key turns to pull the starter relay had broken a tooth.  While I was in there, I replaced the broken turn signal switch and installed a new transmission lever return spring that had broken.


The only real problem was the seal that keeps grease in the mid-joint of the column was leaking and worthless.  When it comes apart, it's a pretty simple set up with two metal squares clipped onto a rod that goes through the center of the shaft.


The only two things that hold it together are the rubber seal and the pressure of being bolted in on both ends.


I cleaned it all up, put in a wad of new grease and installed a new seal.


After painting it, with a little help to guide it in place (ya my wife thinks she's a mechanic now) I bolted it all back together and moved to lower section.


With the motor installed and some weight on the car I was able to install the rest of the steering assembly.  Everything's new from the connection between the steering column and new pump to the ends of the tie rods.


I mocked up the steering while the engine was out because it's easier with nothing in the bay, but I didn't tighten up anything until I had some weight from the motor.  I didn't even try to hook up the sway bar prior to stabbing the engine, it won't even come close and would probably damage the connections if you did manage to hook it up.  It's still a struggle getting it on without the weight of the body, bumper, radiator, etc. that's not going on for a while.


Lastly, a new steering pump.  I have primed the system by spinning the pulley with a plastic rod, but I'm not putting a belt on it until the engine is running.  One less fluid level and system leak to worry about when I'm trying to break in a cam.

Distributor and Spark Plug Wires


I went with a Summit Racing HEI distributor and MSD 8.5 wire with MSD HEI boots on both ends.


I ran the wires high and tight through the vertical loom that you see.  I like the clean look and it should keep  the wires clear of the exhaust manifold.  Which on a Pontiac is down low anyway.


The only problem I ran into (as shown here) with a normal sized brake booster, there isn't enough room on these vertical looms to fit between the booster and the head.  I ended up grinding about 1/2" off the loom and building an extension out of sheet metal to get the bracket back behind the booster.  The booster covers it completely so visually it's not a big deal but, it was an unexpected nuisance.