Tuesday, July 26, 2016

Passenger Side Front Fender

I've decided that stripping paint off a project car is like opening a Christmas Present from your Grandmother.  You really want to open it and see what it is, but you know it's going to be an ugly sweater.  Sure enough.  I started stripping paint and found about 1/2" of Bondo on the passenger side fender.  It had to have been there for 20 or so years.  It was surprising that it held that long since it was so thick, but it was pretty solid.

So, off comes the paint


And here's what I found in my "Christmas Present from Grandma"


Who drives that far through road tar?


Bumper rub hole.

The worst part was that the dent was right on the body like that goes up the side of the LeMans.  It was obvious they didn't remove the fender to fix it at the body shop.  They did the best they could hammering it out and then filled it in.


I went to the fiberglass upper grill piece and made a template to bolt onto the fender so I would know where to rough in the shape and the body line.


It worked pretty good.  If you look closely in this photo you can see the work I had to put into it.  Because the body shop was beating on it while it was on the car, the angle forced them to get the body line about a half of an inch too low.  In the picture you can see a dark line where the peak used to be before I worked it up to the crown mark on my template.  Of course, it's still going to need body filler, but probably about 3/8" less than it had.

Then came the rust removal and patching.


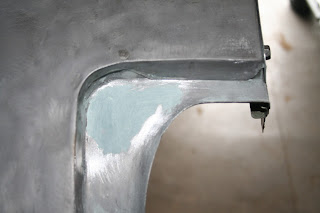
This hole seemed to have been rubbed in the fender by the bumper.  So I ground it out and gave it a good soaking with phosphoric acid to convert the rust I couldn't get.


Then I cut a patch.


Welded it in.


 Then covered it with a waterproof short strand fiberglass enhanced body filler.  It will keep moisture or even humidity from getting through possible pinholes in the weld, which other body filler would soak up and turn to rust.  It's just rough sanded for now.  It will get worked more when I do the finish work.

The rusted out spot.


There was a rusted out hole behind the lower chrome (which I will NOT be putting back on).  There were also a couple of holes one from the chrome and the other from an emblem...I think.


I removed the rust with a cutting wheel.  I later wished I had cut out a rectangle instead of a triangle.  I ended up burning through the two points and it took quite a bit of work to fill them in and make it look good.


I scraped, brushed and chiseled away as much rust as I could see and then I soaked the brace plate with phosphoric acid and converted as much rust as possible.  Then followed up with a rust converting paint.  I still plan to work the back side of the fender, catalyze it with acid and paint it
with POR-15.  I love that stuff


I then fit a patch.


Welded it in place and welded the two bracket holes closed.


Hit the welds with a grinder.


Prepped it with a 36 grit and a pre-paint cleaner.


Then covered it with the short strand fiberglass enhanced filler to keep the humidity on the outside.


I finished the patch off with filler, covered the fender in glazing putty, then finished the sanding.


Lastly, a coat of epoxy primer.  In the picture you can see how the filler absorbed the epoxy and sealed.
Friday, June 24, 2016

Body Work

Life got in the way so, I haven't posted for a while.  I've set the goal to paint and roll by next Spring.  So, it's time to start the body work.  I decided to start with the front wheel wells.  I know, I know.  You're saying "Didn't you know you can buy those?".  Well, I've learned that after market parts are never as good as originals.  They are always thinner and never seem to fit perfect.  More than that though, I'm cheap and since these wheel wells won't really be seen by anybody that looks at my car (I don't plan to enter any car shows) this is a good place to practice my welding and sheet metal skills.


Ya, they look pretty rough.  The only areas that aren't rusted are the areas covered by road tar.  It looks like the prior owner passed a little too close to a road crew at some point.


Most of the bolt holes had been wobbled out and some had cracked the metal.  So, after stripping all the paint, rust and road tar off, I proceeded to weld patches on the trouble spots.


Clamp


Weld


Grind


Cut a new hole


Same process on the other wheel well


I used the POR-15 process to cover everything.  I have used it on other projects and if you follow the directions it works great and leaves a ceramic kind of coating.  The one problem is that if the item is exposed to UV rays it will develop a white powder kind of coating.  That shouldn't be a problem with these wheel wells.


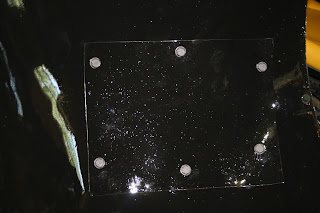
The major problem I had to tackle was an access hole the previous owner had cut into the passenger side wheel well to access a bad blower motor.  I guess that was easier than removing the fender.  I decided to put a removable patch in there since it was much easier than trying to butt weld a patch in and who knows?  I may need in there again someday.


Since this part is completely covered by the fender, I'm not too worried about what the back side looks like.  I may put a silicon gasket in there someday, but for now, I have no plans to drive in the rain or even when there's the possibility of rain.


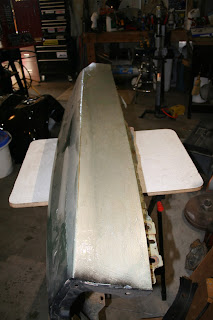
And they ended up looking like this.  Now on to the fenders, the doors, the roof the rear quarters, the.....


Friday, February 19, 2016

Electrical stuff

I really wanted to clean up the engine bay so, I rerouted transmission lines and I wanted to reroute some of the wiring.  The factory harness just drapes wire all over the engine.  So, I started to tag and trace everything.  I used binder clips and toe tags.  I guess that's what their called anyway.  Every wire got marked.


With the engine started, it quickly became apparent that the old 61 amp, or so, alternator wasn't going to cut it with the new radiator fans.  I was planning to clean up the engine bay wiring anyway so, that was the next chore.


I installed a 140 amp alternator with an internal voltage regulator so I could have just one wire running across the engine instead of the bundle in the factory wiring harness.  When I took that bundle apart to trace wires, I found 4 or 5 wires in there that were terminated.  They must have been used on options my car didn't have.  I also ran one wire to the new engine temp sensor.


This is all that's left of the factory wiring.  I removed all the old voltage regulator, alternator and coil wires.  The wires that used to run across the engine to the coil, electric choke and oil pressure are now routed through the interior of the car and come out on the passenger side.


You can see the rerouted wires coming out, just below the A/C air intake.  The stubbed one is for the transmission temp sensor.  I didn't think about installing it sooner.  To do that now, I would need to drain the tranny and braze the sensor adapter into the fluid pan.  So, I'll wait until I change the fluid and filter at the 500 mile mark.  (Because I rebuilt the tranny.)  I'm not too concerned about the transmission overheating while I break in the engine.

You will also notice that the monster air conditioning evaporator didn't go back on.  I hate the looks of that thing.  I'm sure that after sitting for the last decade or more, all the o-rings leak and I'm not sure it even works because the compressor was gone when I bought it.  I added it up and to recondition that monstrosity and replace all the parts I would need, it would cost more than one of the new Vintage Air A/C systems, and I'd still have old less efficient tech.  So, I've ordered an A/C delete plate that I will put on there and eventually replace everything under the dash with a Vintage Air system.


I went with the Equus 8000 series gauges.  I like the look and the one I used to replace the dummy light during engine start up worked well.  For now, I've just wired them all out of the radio hole in the dash.  I'm going to create a plate for them to mount in when I remodel the interior.  I'll either fabricate a mount for the stereo where the ash tray used to be or put it in the glove compartment.

Monday, January 11, 2016

Startup

I finally lit a fire in the old girl.  She may not be the prettiest girl at the dance, but at least she can get her groove on now.

https://youtu.be/Xc738EfFjQY

Wednesday, January 6, 2016

Radiator

I decided to go with a 3 core aluminum radiator.  The aluminum radiators are almost the same dimensions as the original...almost.  So, I had to make some brackets to get around the core support area and hold the radiator tight since I couldn't use the old fan shroud even if I wanted to because of the difference in size.

My wife didn't think my zip-tie mounting brackets would work very well, but they did the job of holding the radiator in place while I secured it.


For the bottom braces I had to get around a some core support frame so I built the brace you see below.


After welding the pieces together


I coated the braces in Plasti-dip


The top brackets where much more simple.  A piece of steel bent into a 90 degree angle, drilled for a bolt hole and ground to fit and then painted.  After final fitment, I did put a slice of bicycle inner tube between the bracket and the radiator.


Then, I had to build a mounting bracket for the radiator over flow.  Here is the one that came in the car.  Now I know where Downy fabric softner got the idea for their bottle!  From a 1970 Lemans radiator overflow reservoir.


I built this bracket instead.


Then painted it black and bolted it on.  You can see the new overflow above it.  Wifey says it looks much better than the old one.  I don't know.  The old one may have held softer water.


Lastly the tranny cooling lines.  In an effort to clean out the engine bay as much as possible.  I'm going to try and route these through the fender above the wheel well.  If it doesn't work, I can always change them back.